Monday, December 27, 2010

End of the year

The end of the year is approaching fast! And if I look back at this blog, for this year it was pretty dead...so one of my resolutions is to make it more active, and report often on the developments here, which are slow, but plentiful.

So I will start by a project which I developed and build early in the year, and never used it, as it was a very impractical solution for the problem it meant to solve.

So, in my quest to measure things around here, and as you might remember from here, I was always curious about how much garbage we make. We separate organic garbage, glass, paper and normal garbage. And since January we have been separating plastics as well.
We then decided that we should aim at bringing the least amount of bags home, by reusing the bags we are given. But as we all know, what we can not measure we can not control, and as such I needed a way to measure how many bags we bring home.

Paper and pencil by the door would probably have done it (and resulted in a more usable solution) but I saw an opportunity to apply some electronics and build a button box, where one could press a button to indicate that a bag was brought home.

I expanded the system to be able to log all kinds of garbage, organic, paper, glass bottles, plastic garbage, bags and all other garbage.

I made use of a JeeNode, of course, and used a pen box to make an enclosure. The result was pretty good I think:
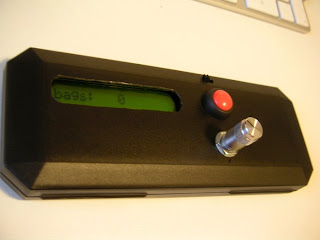

(A few days later I went to California, and found a much nicer knob at a Radio Shack...no pictures though...)

Here is a picture of the guts of the machine:


I made a small board to connect everything to the JeeNode, and managed to scavenge enough pins from the JeeNode for all the necessary connections.
So here is a hint, if you need more than 8 I/O pins with your Jeenode you can use:

The IRQ pin in every port is connected to the IRQ 1 of the Arduino, which is in fact pin 3
Pins 1 and 2 of the SPI connector - connected to Arduino pins 8 and 9 (as in the JeeNode datasheet)
RX/TX in the FTDI connector - connected to pins 0 and 1 of the Arduino
SDA/SCL on the TWI connector - connected to Analog 4 and 5 of the Arduino (I think...I don't remember anymore)

and I bet you can also scavenge a few from the ISP connector. of course, by doing this you are once more away from the encapsulation that the JeeNode libraries aim to achieve...but it is always worth considering for those projects that need a lot of input/output.

In the above project, I used 6 lines to drive the LCD (in 4 bit mode), one for the switch and 2 for the knob, which uses interrupts.

The rotary encoder changes occur during the action, so I needed an interrupt to detect the action in there. More on that on a later post.

So when the power switch is turned on (no low power states) one can choose the type of garbage by turning the knob.
Upon pressing the button, it enters a "add garbage" state, where the user can add (or subtract) garbage in increments of 50 gram again by turning the knob. When a certain time elapses with no changes that amount is added to the running total and the system goes back to the choose garbage mode.

One of the options in the root menu is to send the stuff, which sends the data via wireless to the server.

The data is kept internally in the EPROM and sent over in units of 50 gram (to simplify and use integers only instead of floats), and is converted for display only.

For plastic bags and bottles the user adds units and not weight.

After all this story, I stopped using the machine after one week, after having spent hours weighing all the garbage as it went out - it is a lot of work - and my wife convinced me that I must find a better solution, or just admit that we make as much garbage as everybody else.

One simmering in the back of my head is to connect a scale directly to the system, and maybe use RFID tags to detect which garbage it is...but that is a project for the next 5 years...

I am now considering using this machine to implement my opentherm thermostat, as it has pretty much all I need, apart from the special circuitry for the physical layer.

Next post will be about the JeeNode controlled RFID lock, which, is ready, and if it wasn't for the cold outside I would have installed already!

Sunday, December 12, 2010

Weather station update!

It has been quite a while since I last posted here, it was a busy year! I became a father, and that took a lot of the time available to report - I still get quite some time to do the things, only no time to spend here reporting :) , but I hope to revive it now!

So here is an update on the weather station!

Finally, after 11 and a half months the thing died! in the coldest night of the year, after sending a packet indicating -8.1C outside at 3 in the morning...

funnily enough, the FS20 switch that turns the boiler on and off died (stopped receiving) at approximately the same time...can't explain it, it wasn't cold in the room where that one is located...

It sent 51273 messages on a set of 3AA GP branded units, which were not new when it was put outside. Since for each packet I measured the wind for 1 second, this means the JeeNode was in full power mode for a bit over 14 hours.

Anyway, I opened it, days later, and when the temperature outside was up to -1 and the batteries read about 1.9V, or about 0.6V per cell.

I wonder if the fact that the Atmega runs at 16MHz, which is out of the specs at 3.3V (let alone 1.9V), contributed to it failing at low temperature/very low voltage as well, or if it could have been pushed any harder! It is out now with a new set of batteries, since 8/12/2010, but I need to redo the anemometer, so I don't think these batteries will be out until they die!

I think this was a victory for a JeeNode in low power mode!


As for the FS20 switch, I still do not know what happened...It just would not receive, until I moved it to a different place, where reception is fine. I wonder if all the snow on the roof created some effect, which prevented it from working properly. Maybe i should try now that the snow melted. However, if that is the case, then I definitely can not leave it there, as it is precisely when it is cold and snowy outside that I need it the most!
Plans are on the making anyway for a JeeNode OpenThem controler, which should be comming soon. I already developed the control loop (PI) which determines the desired water temperature, now I just need to adjust the PI coeficients and implement the hardware, for which most components are already in the house!

I hope to report before the new year again on another project!

Saturday, January 9, 2010

Tektronics 453

Just got an old Tektronics 453 Oscilloscope that was going to go in the garbage!! Looks great and it works! which is the most important part! now I can finally check the hall effect sensor I got in Taiwan when near the water meter to see if I can detect the parts rotating inside the meter. At this moment the signal is smaller than what the Arduino can detect, and I would like to see the signal before starting to build an amplifier - also to know how much amplification does it need!


It came with 2 probes, nice old ones, one from Phillips and one from Tektronics! I think there are some more goodies where this one came from (my wife got it for me from the lab at her work), but I don't know what they are yet (my wife has no idea what these things are, or what they are for!)
Out to try out my new toy now!!

Tuesday, January 5, 2010

Weather station

The Weather Station is finally complete! That is at least the beta stage!
(the beginning of the development was a long time ago)
Here is a picture of it standing outside:


It has been there for a few weeks now, since the 13th of December, enduring the snow and ice that this winter has brought us, sending a packet every 10 minutes.

The station is based on a JeeNode, with a LDR to sense the daylight, an SHT11 to sense temperature and humidity, and a home made anemometer to sense the wind speed. Here are some photos:

Complete setup, fits nicely inside an electrical box fit for the outside.


Details of the main box. The JeeNode is visible on the left. I had to take about half a millimeter from it in order to fit inside the box. I painted pin 1 of each port with tippex and put a dot in each of the ports to know which one is which as I kept having to refer to the datasheet. The whole thing is powered by 3 AA Alkaline batteries. The wholes that lead to a sensor are covered with corks to prevent water from coming into the brain of the station..

Detail of the light sensor: an LDR. The window I made by warming up a package of hard(ish) plastic and pushing it into the whole using a small spoon. All the electronics for each of the sensors are near the sensor itself, and only 3 cables leave the sensors: Vcc, Gnd and signal (except for the SHT11).

Detail of the SHT11. This one is floating, protected inside a little cheese box, painted white using tippex (I was too lazy to use proper paint...and it was cold outside to use it anyway...and the tippex was right in front of me...and I don't use tippex for anything...)

Detail of the anemometer. I used the center of a CD spindle, attached 3 half's of ping-pong balls, and improvised a bearing from a VHS recorder roller. It fitted nicely in some electrical tube. The sensor is a optical emitter/receiver in the same package. It has not been calibrated, as I only need an indication of the amount of wind, in order to automatically lift the sun screens.

The nice thing is that I initially built the sensors to work with 5V, as I always used arduinos, then the JeeNode uses 3.3V, so I thought I had to adapt some things...not for the light sensor, as it is a basic divider, but for the optocoupler. But I tried it, and it worked fine even at 3.3V!

I spent a lot of time fighting with low power modes of the JeeNode, and finally got it to some sort of power down...which I believe will allow it to work for a few months from the batteries...lets see...I will try to make a post about that soon, as it is also of interest for the JeeLabs community.

So far it has sent 3271 packets. Here are the latest ones:

3267 1 0 0.5 87.4 @ Tue Jan 5 21:26:58 2010
3268 1 0 0.5 87.2 @ Tue Jan 5 21:37:17 2010
3269 1 0 0.5 87.3 @ Tue Jan 5 21:47:37 2010
3270 1 0 0.4 87.6 @ Tue Jan 5 21:57:57 2010
3271 1 0 0.3 87.6 @ Tue Jan 5 22:08:17 2010

The sequence of numbers corresponds to: sequence number, light level, wind level, temperature in Celcius and relative humidity in %.

I have now to put the JeeLink receiver in the server to be able to put all data into a database and use it for something useful!

(2 posts in a day! great! it must be the cold outside...)