Showing posts with label plastic. Show all posts

Monday, October 9, 2017

Blocks Zero 3D printer

A few months back I ordered a Blocks Zero 3D printer in kit. It appeared to be a nice printer, made in Portugal!

Received it and finally had the opportunity to assemble it after the holidays.

What a great little printer it is! Great build quality, great assembly instructions, and everything worked right out of the box!

Go check it out! and if you need a small printer - it will only print 12x14x12cm in PLA - I think it is a great contender!

I ordered a heating plate to install a warm bed to be able to print ABS, but I'm not sure I'll install it. At least not now. It just runs so well and produces such nice parts that I'm not sure I want to change it.

If you do assemble one, be sure to check the additional assembly instructions at their website, which I wasn't aware until after I figured out how to assemble those extra parts.

Here are some pictures of the final product.


Once I finished assembly, I wasn't very happy with the black display being left there in the hole, so I designed and printed a little frame for it, which I think really ties the whole thing together. And the precision on the printer is so good, that it fit right in. It's a tight fit! It was a bit difficult to take it out from the base plate, and it broke a tiny bit, which I glued back in place. Might print another one soon.


The files can be found here on the google warehouse.

I would advise to remove the display for installing the frame.

Tuesday, February 7, 2017

Prusa i3 improvements

As I've been posting here, I have a prusa i3 on loan for a couple of months.

A few weeks ago, I got a piece that had no plastic deposited on one specific area, and was fine on the rest. This was very odd, so I had it reprinted and stayed around to see what happened. Immediately I saw that the extruder stepper motor was not turning. I looked around to try to see the reason for this, and found the culprit: a damaged cable:

Extruder stepper broken cable

I tried fixing it, by taking out the small metal tab in the connector, but that didn't work for long.
I talked to the owner of the printer and he had a spare cable. According to him this had happened before, and was a common problem.
The issue here is that a lot of stress is put on that particular cable as it travels left and right along the X axis all the time, plus vertically, although that is a slow and much less often travel.

Since I don't like problems that reoccur, I thought of a solution: a cable holder that transfers the stress from the connector to the cable, which is a point much less prone to failure. So I designed a cable holder that holds not only the extruder stepper cable, but all the cable for heating the extruder and for the fans. Here it is, printed in glow-in-the-dark PLA:

Extruder stepper cable holder

This makes the whole cable behave much better, and I think will also prolong the life of the extruder heating connections. I also printed one for the X-axis stepper motor which travels up with the Z-axis:

X-axis cable holder


You can find these models in the warehouse here.

While discussing this problem, I also realized the cable proving the heated bed with power also keeps traveling back and forth along the y-axis and so it would also fail sooner or later, so I also designed a little holder for this. You can find it in the warehouse here:


Heated bed cable holder

Wednesday, February 1, 2017

3D Printed zipper fix

I have been very busy with the 3D printer, and have a lot of pictures and material to post here, so stay tuned!

Today it's about a little fix: a broken zipper on my daughters favourite backpack.

As you can see in the picture, the zipper handler was broken, but she was still using the backpack, however difficult it was to open it.

The broken handle

This hardly asked for a 3D printer to fix, but, since I was busy printing stuff, why not print a handle for the zipper? So that I did.

The handle, in glow-in-the-dark PLA

I then used a dremel to cut a groove on the printed PLA (glow-in-the-dark) part, and used epoxy to glue it on.

This is the final result, she is very proud of it, and of me having fixed it, and she loves that it's glow-in-the-dark!

The handle glued in place

Friday, December 2, 2016

3D printed Apple Airport Extreme Wall mount

I got a 3D printer on loan from a friend, it's a Prusa i3.


I have used it before by designing and taking the files to him for printing, but this allows me to quickly check and made adjustments.

So to start, I had a wall holder for an Apple Airport Extreme wifi router design that I made a few months ago, but never got to print, since I then made such a holder out of acrylic.

By accident, the acrylic holder broke a few days before I got the printer, so it was the perfect opportunity to try it. Here is a rendering of the holder:


I printed it using PLA, and got quite a nice result! Here are a few pictures.


I use Sketchup to design the models. If you want to have a go, you can find the sketchup model on the warehouse here.

Monday, October 15, 2012

Switch Box

This weekend I finally finished a project that has been on my mind for quite some time: a Switch box!

In a few words, it is a box of electrical plugs, each with its own switch.

A few months ago we changed our old CRT TV by a new flat modern HD thing, mainly to get rid of the annoying little decoder box that we were forced to use in order to see the channels that we liked that were moved from analog to digital, and, since we every night switch off all devices, in the hardware switch we made sure the new TV had such a hardware switch.
So when we come home, all happy with the new TV, and switch, we discover that the nice sound bar that came with the TV not only required a separate power supply (plug) but didn't have a real switch, that allied to some devices hanging around that did not have a hardware switch (DVD player) which required a unplug action, until I hacked a light switch on to the cable, I decided to make the following contraption.

 Under side

 Top side


It is a series of 6 plugs, just like an extension cord, but where each individual plug has its own switch, UK style. I then hid it under the furniture where the TV and all devices rest on, with the plugs nicely hidden under it.
I think these things should be sold in shops! As a side note, I did consider having a remote control for this, using a micro-controller and some SSRs,  but that would complicate it, both in terms of build time, and safety considerations.
I am also not sure I it will ever recover its cost in saved energy, but hey, if we account for the energy I save going around unplugging devices at the plug, it already payed it self off today!

I hope you can get a good idea of the result from the pictures!


Mounted in place


Another view of it in place

Monday, December 27, 2010

End of the year

The end of the year is approaching fast! And if I look back at this blog, for this year it was pretty dead...so one of my resolutions is to make it more active, and report often on the developments here, which are slow, but plentiful.

So I will start by a project which I developed and build early in the year, and never used it, as it was a very impractical solution for the problem it meant to solve.

So, in my quest to measure things around here, and as you might remember from here, I was always curious about how much garbage we make. We separate organic garbage, glass, paper and normal garbage. And since January we have been separating plastics as well.
We then decided that we should aim at bringing the least amount of bags home, by reusing the bags we are given. But as we all know, what we can not measure we can not control, and as such I needed a way to measure how many bags we bring home.

Paper and pencil by the door would probably have done it (and resulted in a more usable solution) but I saw an opportunity to apply some electronics and build a button box, where one could press a button to indicate that a bag was brought home.

I expanded the system to be able to log all kinds of garbage, organic, paper, glass bottles, plastic garbage, bags and all other garbage.

I made use of a JeeNode, of course, and used a pen box to make an enclosure. The result was pretty good I think:
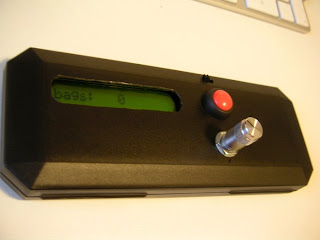

(A few days later I went to California, and found a much nicer knob at a Radio Shack...no pictures though...)

Here is a picture of the guts of the machine:


I made a small board to connect everything to the JeeNode, and managed to scavenge enough pins from the JeeNode for all the necessary connections.
So here is a hint, if you need more than 8 I/O pins with your Jeenode you can use:

The IRQ pin in every port is connected to the IRQ 1 of the Arduino, which is in fact pin 3
Pins 1 and 2 of the SPI connector - connected to Arduino pins 8 and 9 (as in the JeeNode datasheet)
RX/TX in the FTDI connector - connected to pins 0 and 1 of the Arduino
SDA/SCL on the TWI connector - connected to Analog 4 and 5 of the Arduino (I think...I don't remember anymore)

and I bet you can also scavenge a few from the ISP connector. of course, by doing this you are once more away from the encapsulation that the JeeNode libraries aim to achieve...but it is always worth considering for those projects that need a lot of input/output.

In the above project, I used 6 lines to drive the LCD (in 4 bit mode), one for the switch and 2 for the knob, which uses interrupts.

The rotary encoder changes occur during the action, so I needed an interrupt to detect the action in there. More on that on a later post.

So when the power switch is turned on (no low power states) one can choose the type of garbage by turning the knob.
Upon pressing the button, it enters a "add garbage" state, where the user can add (or subtract) garbage in increments of 50 gram again by turning the knob. When a certain time elapses with no changes that amount is added to the running total and the system goes back to the choose garbage mode.

One of the options in the root menu is to send the stuff, which sends the data via wireless to the server.

The data is kept internally in the EPROM and sent over in units of 50 gram (to simplify and use integers only instead of floats), and is converted for display only.

For plastic bags and bottles the user adds units and not weight.

After all this story, I stopped using the machine after one week, after having spent hours weighing all the garbage as it went out - it is a lot of work - and my wife convinced me that I must find a better solution, or just admit that we make as much garbage as everybody else.

One simmering in the back of my head is to connect a scale directly to the system, and maybe use RFID tags to detect which garbage it is...but that is a project for the next 5 years...

I am now considering using this machine to implement my opentherm thermostat, as it has pretty much all I need, apart from the special circuitry for the physical layer.

Next post will be about the JeeNode controlled RFID lock, which, is ready, and if it wasn't for the cold outside I would have installed already!

Thursday, December 31, 2009

New Year!

Happy New Year!!

And this, I declared the "Bag Free Year" :) I explain: we have a bag in the kitchen, where we put all the bags we get from shopping, and, which are to be used in further shopping, garbage collection, etc. It is always our plan to carry a bag around in the pocket, so that we do not need to get one from the shop when buying something. I often have one in my bike rack, but still, the bag in the kitchen has been growing, as there are many occasions when we do not have a bag!
To add to the whole thing, the city where I live has started to collect plastic separately since the beginning of the year, so we decided to try to reduce the amount of plastic, and other garbage. In fact, we decided that if we have to buy a package, we will prefer the plastic ones! as those can go in the recycling instead of the burning oven. Metal is still allowed as that is easily separated.

So, to implement this I will place a paper in the kitchen, where we have to write every plastic bag we bring from the shops...sanctions are not yet in place...lets see what happens! maybe I create a pachube feed for the plastic bags :)

Lets hope this reduced the size of the bag in the kitchen!

Also in my plans is to measure how much garbage we generate by weighing all the garbage that leaves the house...but that is for later.

Meanwhile, have a happy New Year!